Arch Linux And Openbsd Dual Boot Part One
Dualbooting Arch Linux and OpenBSD
For some time now I have wanted to use OpenBSD on real hardware as I have previously messed around in virtual machines but never on an actual piece of hardware and REALLY used it as a daily driver. I also want to see how this laptop works under OpenBSD without having to either purchase a difference device or wipe Arch Linux just to try it out.
I have my reasons for wanting to keep Arch Linux around in that I really am more familiar with Linux as a desktop than I am with the BSD family of operating systems but I am no stranger to BSD in general as I have used FreeBSD as a server for many years for various tasks and I guess you can count PFSense in that too.
It is nice to have options and having that Arch Linux install as a “backup” when I need that is quite handy but what was lacking or seemingly lacking for me is getting a working dual boot system with both Arch Linux and OpenBSD on the same drive on the same device and be secure.
Requirements
Now for me I do have some requirements which are as follows:
- Both systems must be encrypted without exception. This device is a laptop and if stolen or lost I need either OS to be secure in that respect.
- I need to be able to boot into both operating systems easily and not have to do anything strange like having to run grub commands manually for example.
A little bit about the device I am using for this is that it’s a Dell Latitude 7400 that I aquired as an ex-company device when upgrades were rolled out in the workplace. The device has a decent enough spec being an Intel i7 8th generation CPU with 16GB of memory and a 512GB NVMe SSD drive.
Under Arch Linux this device works quite well. I have had to do some workarounds such as a bash script that when the device returns from a sleep state the script essentially restarts the software behind the trackpad & keyboard as sometimes it could get stuck in a non working state. We’ll get to the OpenBSD side of things later on.
Why
I thought I’d do a writeup of how I accomplished this just incase there is someout out there who desires the same setup. There are resources online but it was very limited on how to get this setup with BOTH operating systems encrypted.
Method
The real trick to getting this to work seems to be the choice of boot manager. Using grub2 as a bootloader did not work for me in my original testing on both my laptop and in virtual machines resulted in zero success. Instead I discovered some software (funnily enough from the OpenBSD side of things) called rEFInd so I delved into this.
Firstly order matters if you want to replicate this setup I found that setting things up from Arch Linux is a easier. You’ll need to boot into the Arch Installer so I would advise following a guide on getting the Arch .iso onto a USB (or other means) and boot into it.
Pre install notes
This write-up doesn’t deep dive into every single command. Ideally you’d have experience with Unix like operating systems beforehand but thinking about it if you were interested in this kind of setup that’s kind of a given.
Arch Linux and partitioning setup
Once in Arch Linux’s installer the first thing to setup is the paritions (after setting your keyboard layout with loadkeys uk for example).
I perfer to use cfdisk for paritioning on Arch Linux as it’s a graphical (curses) interface. Let’s say your harddrive is /dev/nvme0n1 which is what it was for me. Run the command below to bring up the graphical utility.
cfdisk /dev/nvme0n1
You should see something like the following VM I have setup for testing and demonstration:
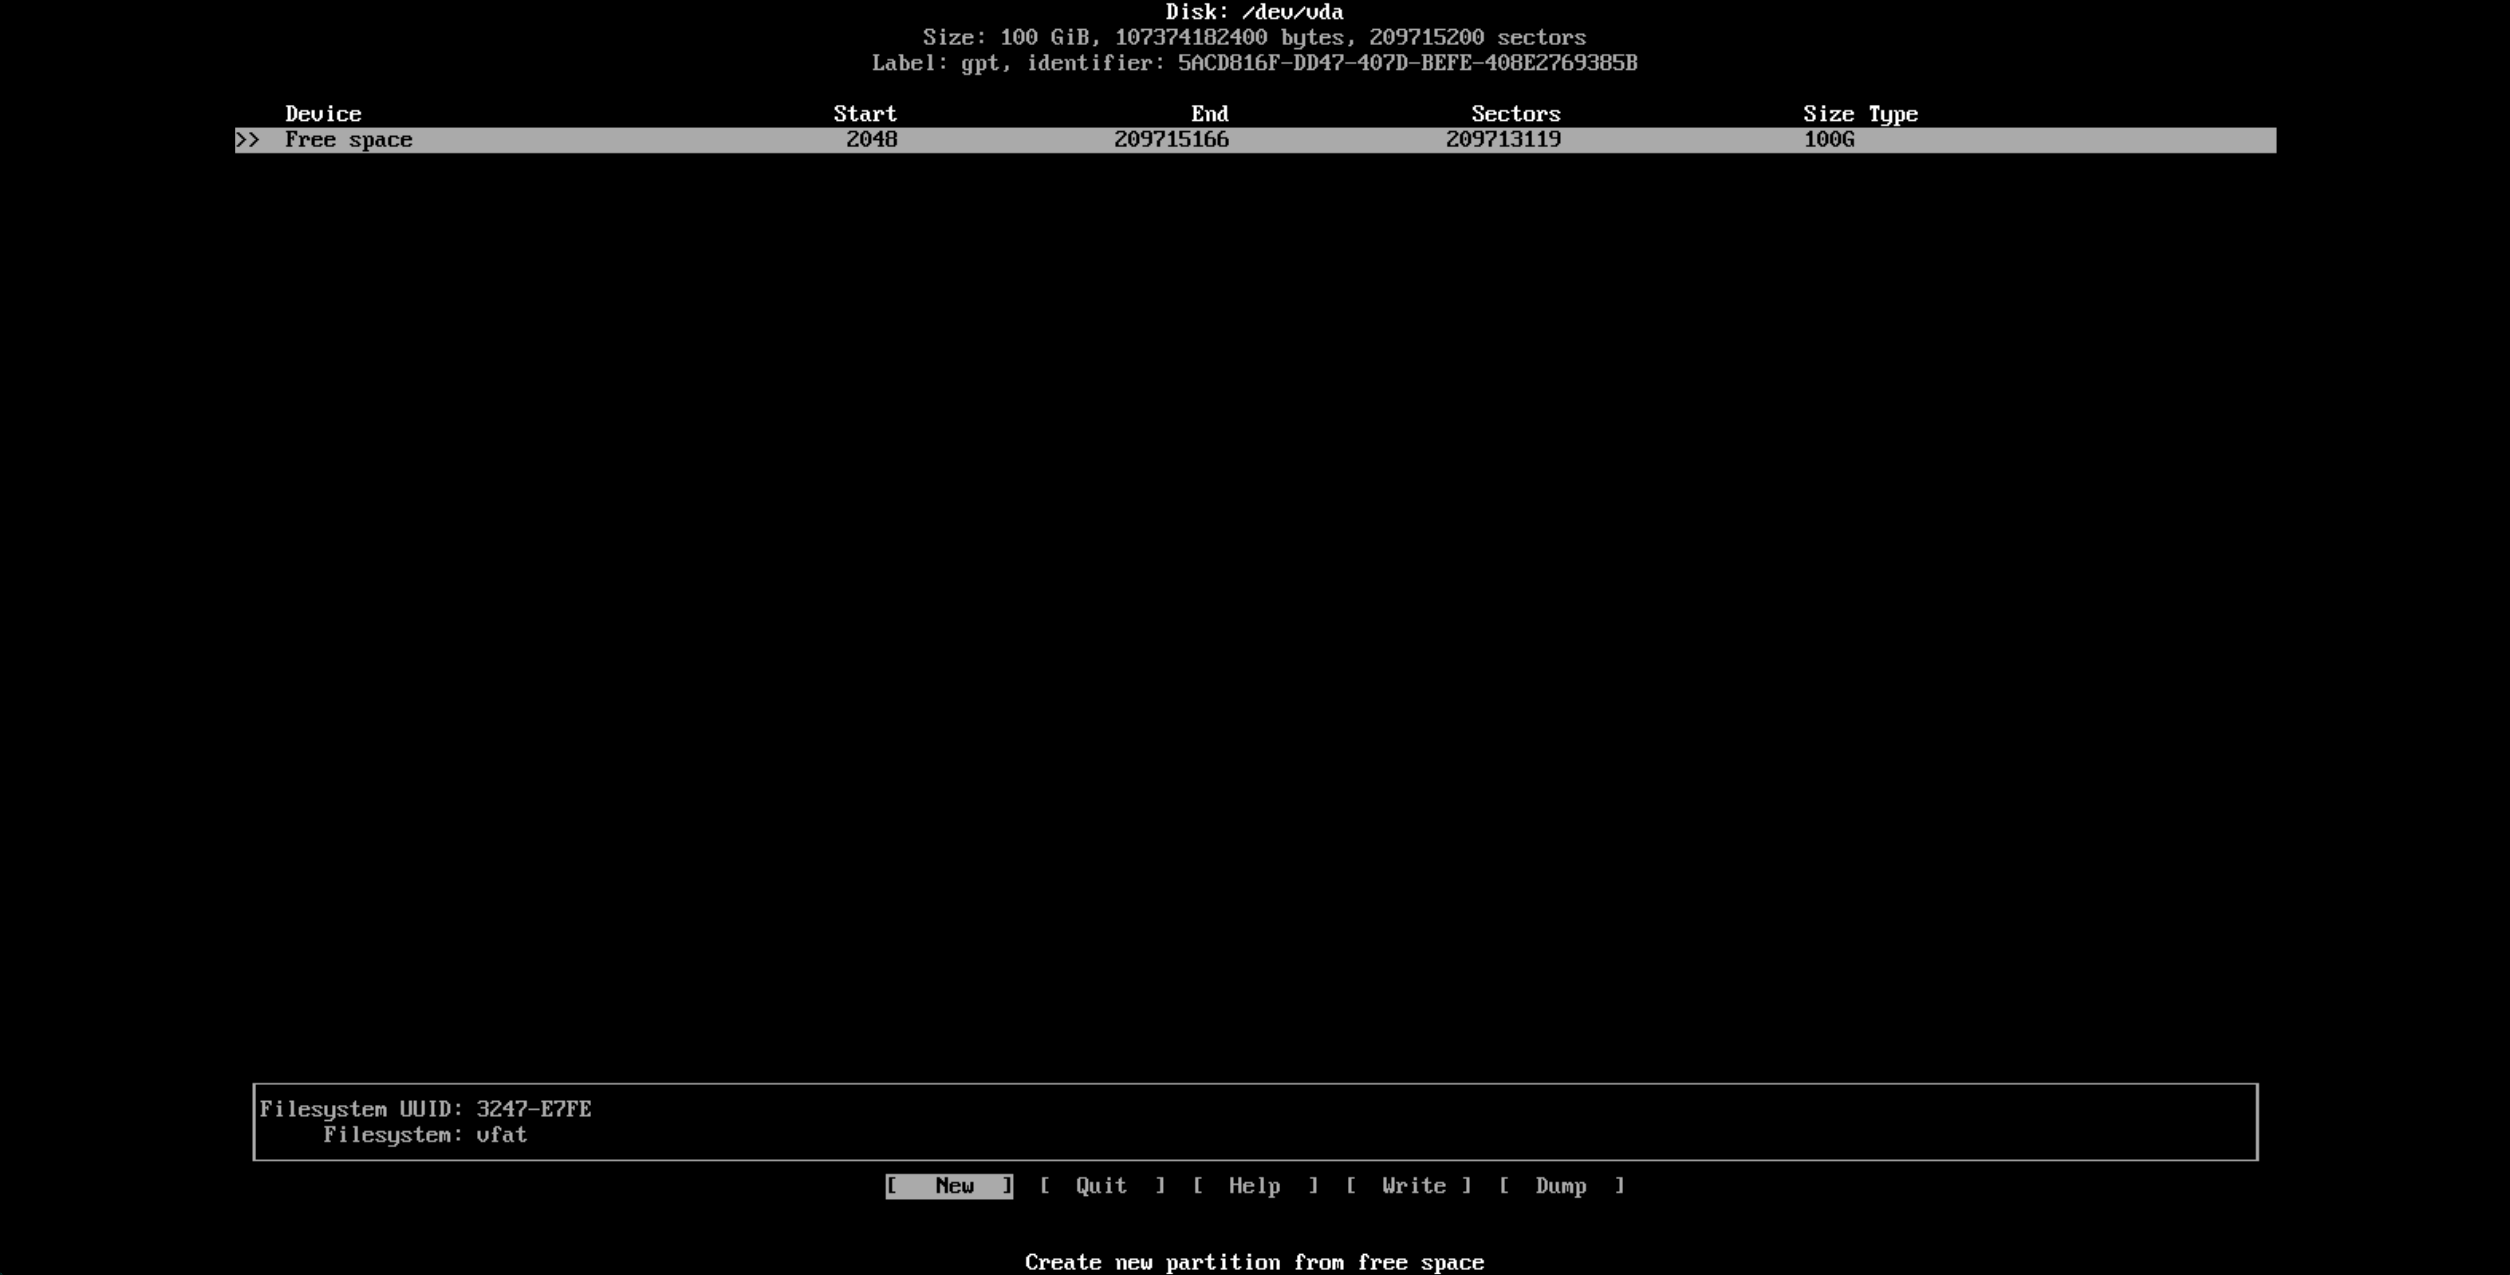
You’ll notice that the virtual disk is 100GB in size and the device is completely free of any kind of partition. Using arrow keys for navigation head to "New" the bottom and you’ll be prompted for parition size.
Firstly I start with the EFI partition and I set this to 512MB and hit enter.

You’ll see the partition appear and in the VM it’s /dev/vda1 but on real hardware it will be more like /dev/nvme0np1 for an NVMe SSD drive.

Now we need to change the type so using arrow keys again while highlighted over the partition press "Enter" on type.
You’ll be given a huge list of filesystem types. Select "EFI System" at the top (at time of writing) and press "Enter" again.
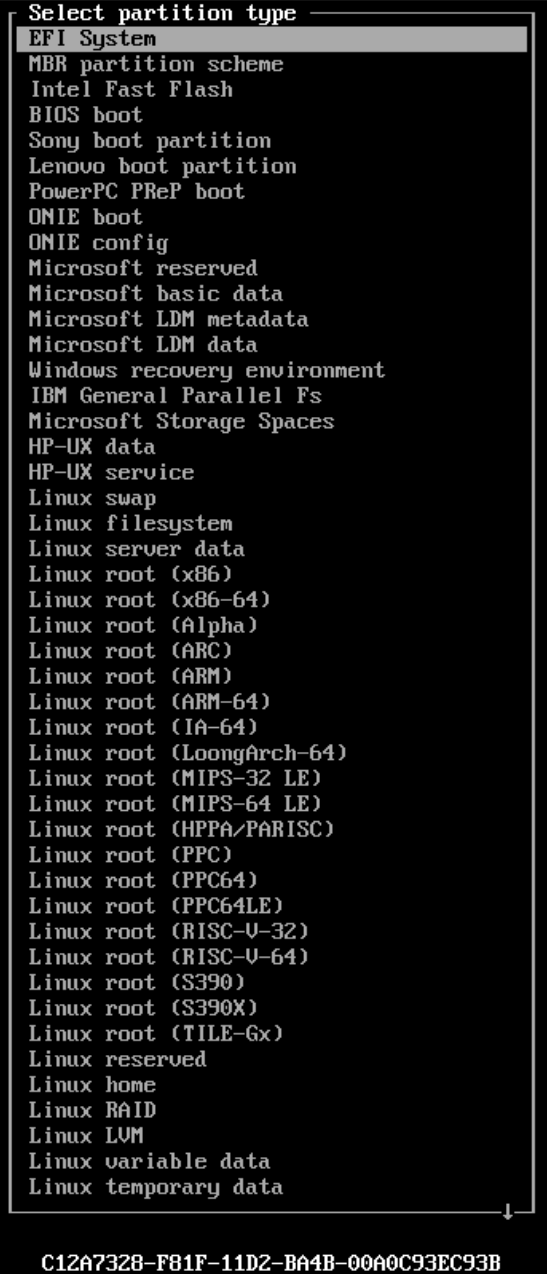
You’ll see the type on that parition change over to "EFI System" on the main cfdisk screen.
Now our next partition will be for Arch Linux and for test purposes in this VM I will set the parition to 50G in the same way we did with the EFI parition. I selected "New" and typed "50G" and enter.
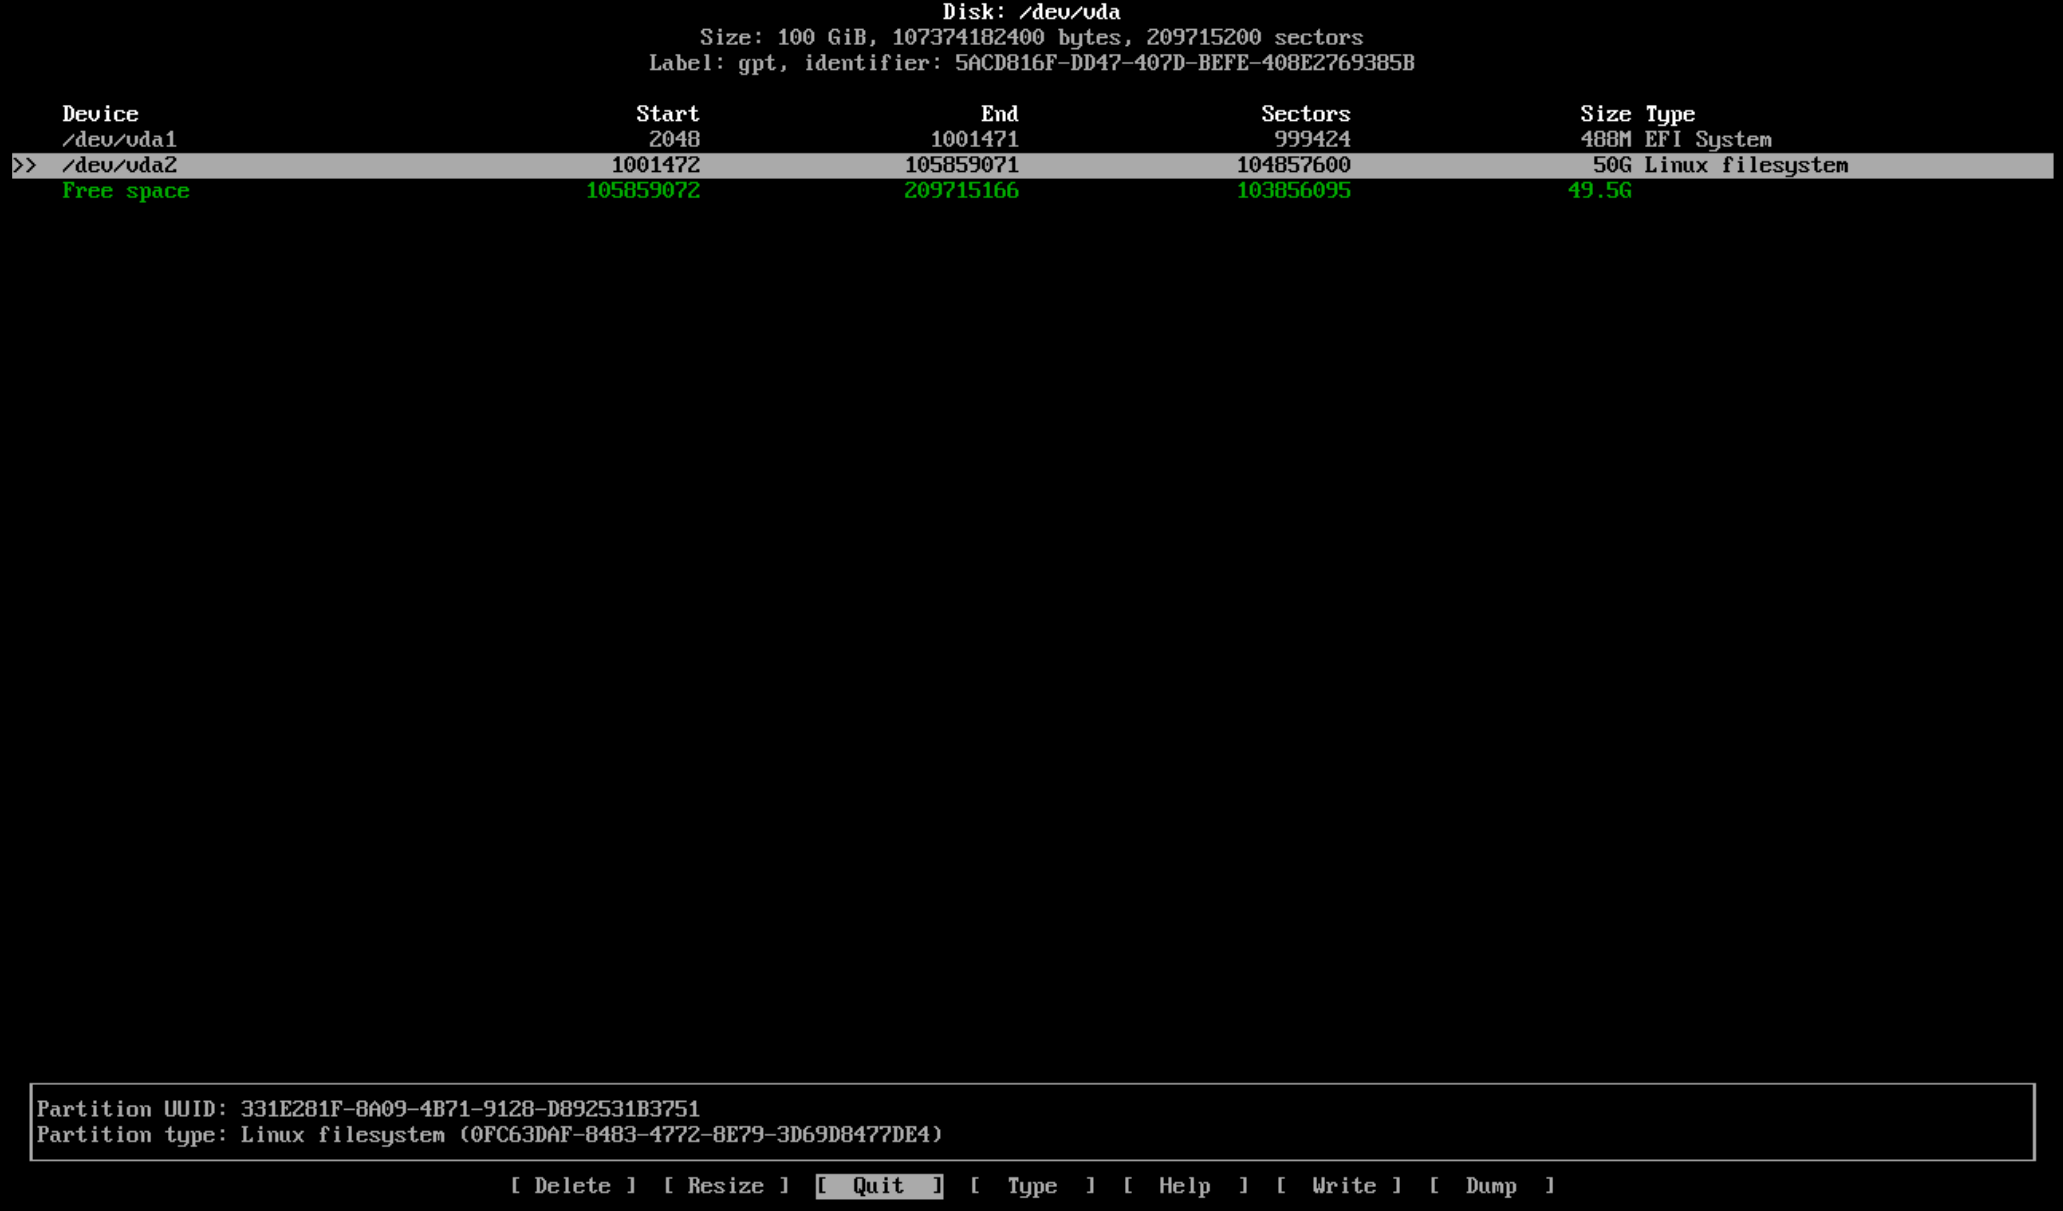
You’ll notice the default type is "Linux Filesystem" in the above screenshot so you can leave that as is.
With the rest of the free space again select "New" and cfdisk fills out the remainder of the disk space so I just press enter again.
For the final partition we’ll want to set the type as "OpenBSD data" from the list of filesystem types to make life easier later on when we go into the OpenBSD installer. When done it should look something like this.
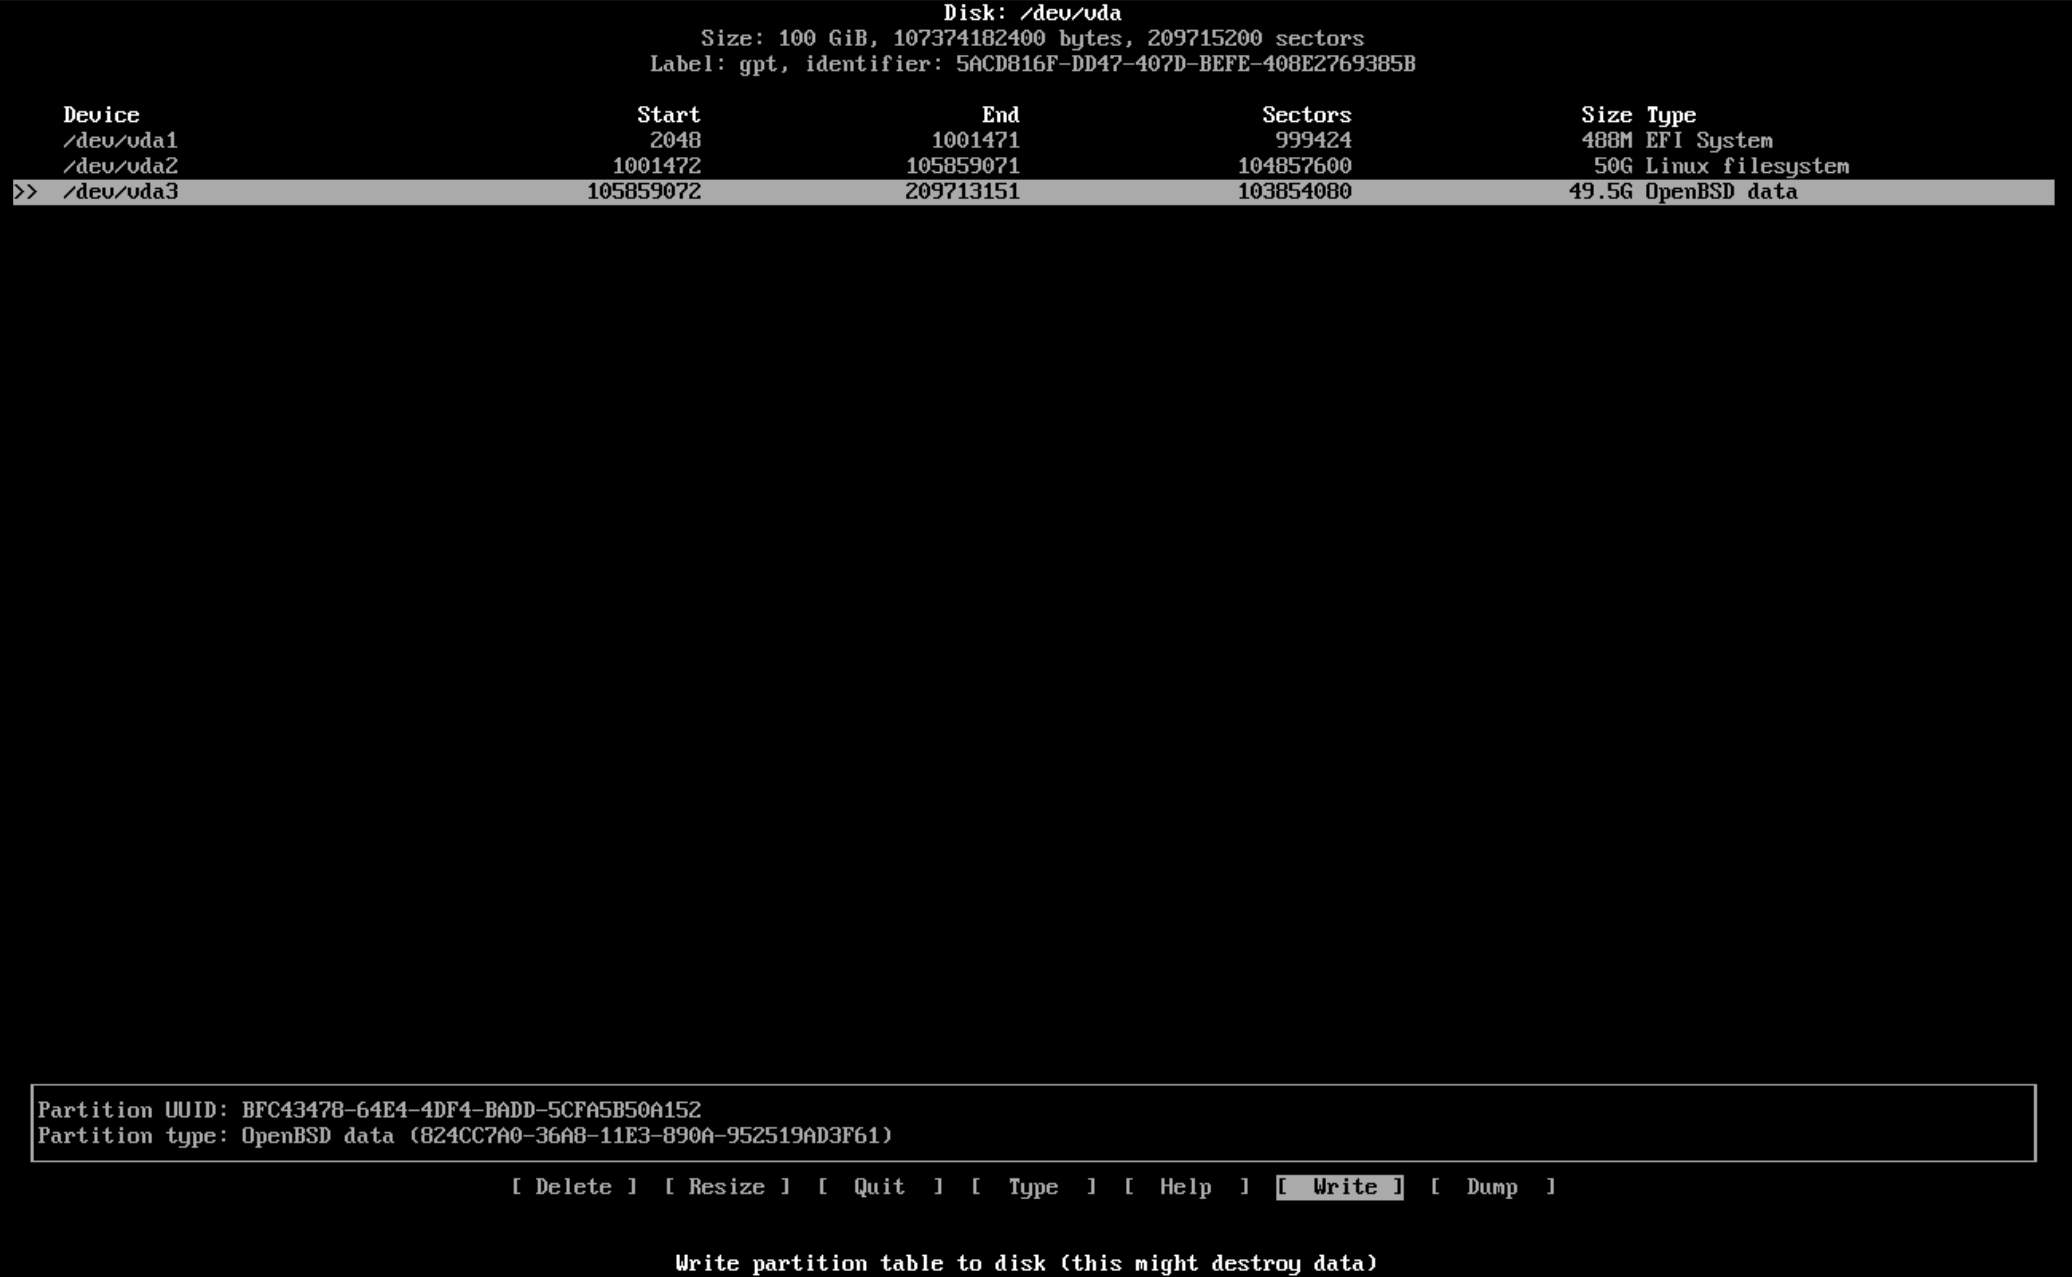
Let us save changes to disk by selecting "Write" and confirming at the bottom and typing "yes" when prompted and then "Quit" once we see "The parition table has been altered." to drop back to the Arch Linux installer.
Now we need to format the EFI partition. Mine is /dev/vda1 but this will be the first partition we made with cfdisk. Use the lsblk command to list partitions. The below command will prepare it as a FAT32 partition which I recommend as this seems to be a filesystem all systems can read.
mkfs.fat -F32 /dev/vda1
Next we need to setup the encryption part of arch linux. It’s important at this step that your keyboard layout is correct for the password coming up. Use loadkeys uk as an example to set your keyboard to UK layout. Use the correct country code for yours.
I begin setup of encrypted partition with:
cryptsetup luksFormat /dev/vda2
Be wary of the parition name again. This should be the second partition you made for Arch Linux.
You’ll be prompted to override data. Type YES and hit enter.
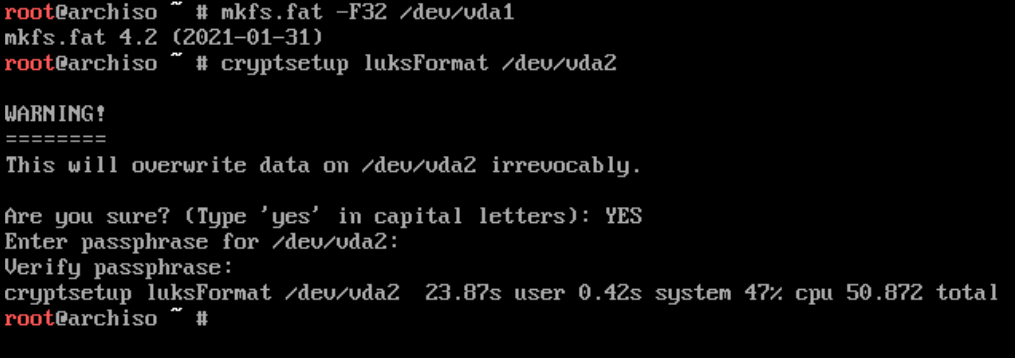
You’ll then be prompted for a password for setup and to verify. Once complete you’ll again be returned to a shell.
Now we need to temporarily mount our newly created encrypted partition with:
cryptsetup open /dev/vda2 cryptroot
You’ll be prompted for your password again and on a succesful entry this will allow us to then modify that partition but first we need need to create a filesystem on it. I use ext4 and I would advise others to.
mkfs.ext4 /dev/mapper/cryptroot
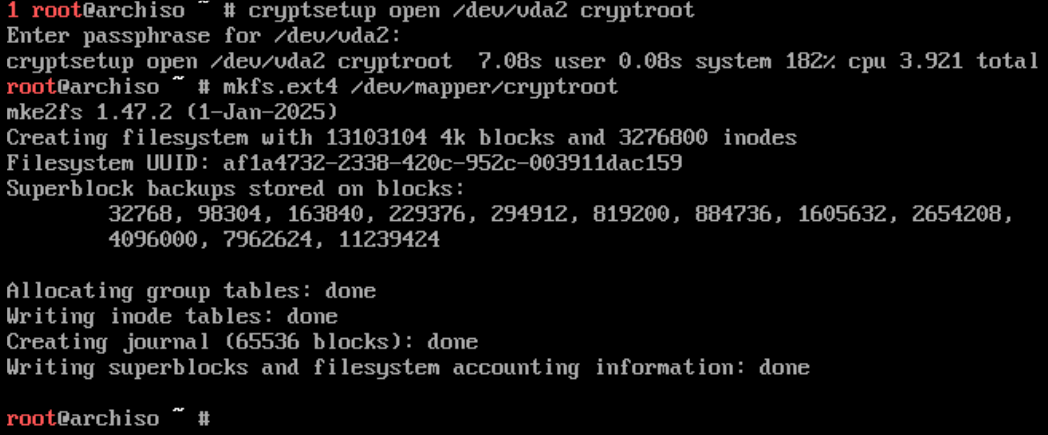
Once this has completed we can now mount the ext4 parition with:
mount /dev/mapper/cryptroot /mnt
This has mounted the unencrypted accessible ext4 filesystem to /mnt and we now need to mount our boot (EFI) partition to /mnt/boot after making the directory:
mkdir /mnt/boot mount /dev/vda1 /mnt/boot
At this point we can now install the Arch base system with the following tools:
pacstrap /mnt base linux linux-firmware genfstab -U /mnt >> /mnt/etc/fstab
Finally enter the Arch environment fully with:
arch-chroot /mnt
I would advise at this point to install software first and foremost as it’s possible to boot into this Arch system and have no networking which unless you want that is pretty useless.
pacman -S dhclient dhcpcd iwd vim
The above packages will ensure we can at least get some networking after the install has completed as it installs dhclient and the iwd wireless networking utility.
I would strongly advise to set a root password now with:
passwd
If you don’t you will not be able to login as root afterwards so again. Please ensure this is set.
Now we need to edit /etc/mkinitcpio.conf and add a hook so we can decrypt Arch on boot. This again is important. Use your favourite editor or install it with pacman -S vim for example if you didn’t add vim in the above command.
vim /etc/mkinitcpio.conf
Find the line:
HOOKS=(base udev autodetect modconf block keyboard encrypt filesystems)
Add ‘encrypt’ exactly like the above and it needs to be BEFORE the filesystems entry or you’ll encounter issues. The line above does not need to look exactly like mine just add encrypt before filesystems. Save the file when done and run:
mkinitcpio -P
Once finished we now we get to the real star tool that allows for all this magic to happen. rEFInd.
rEFInd
Install this tool with the following commands:
pacman -S refind
refind-install
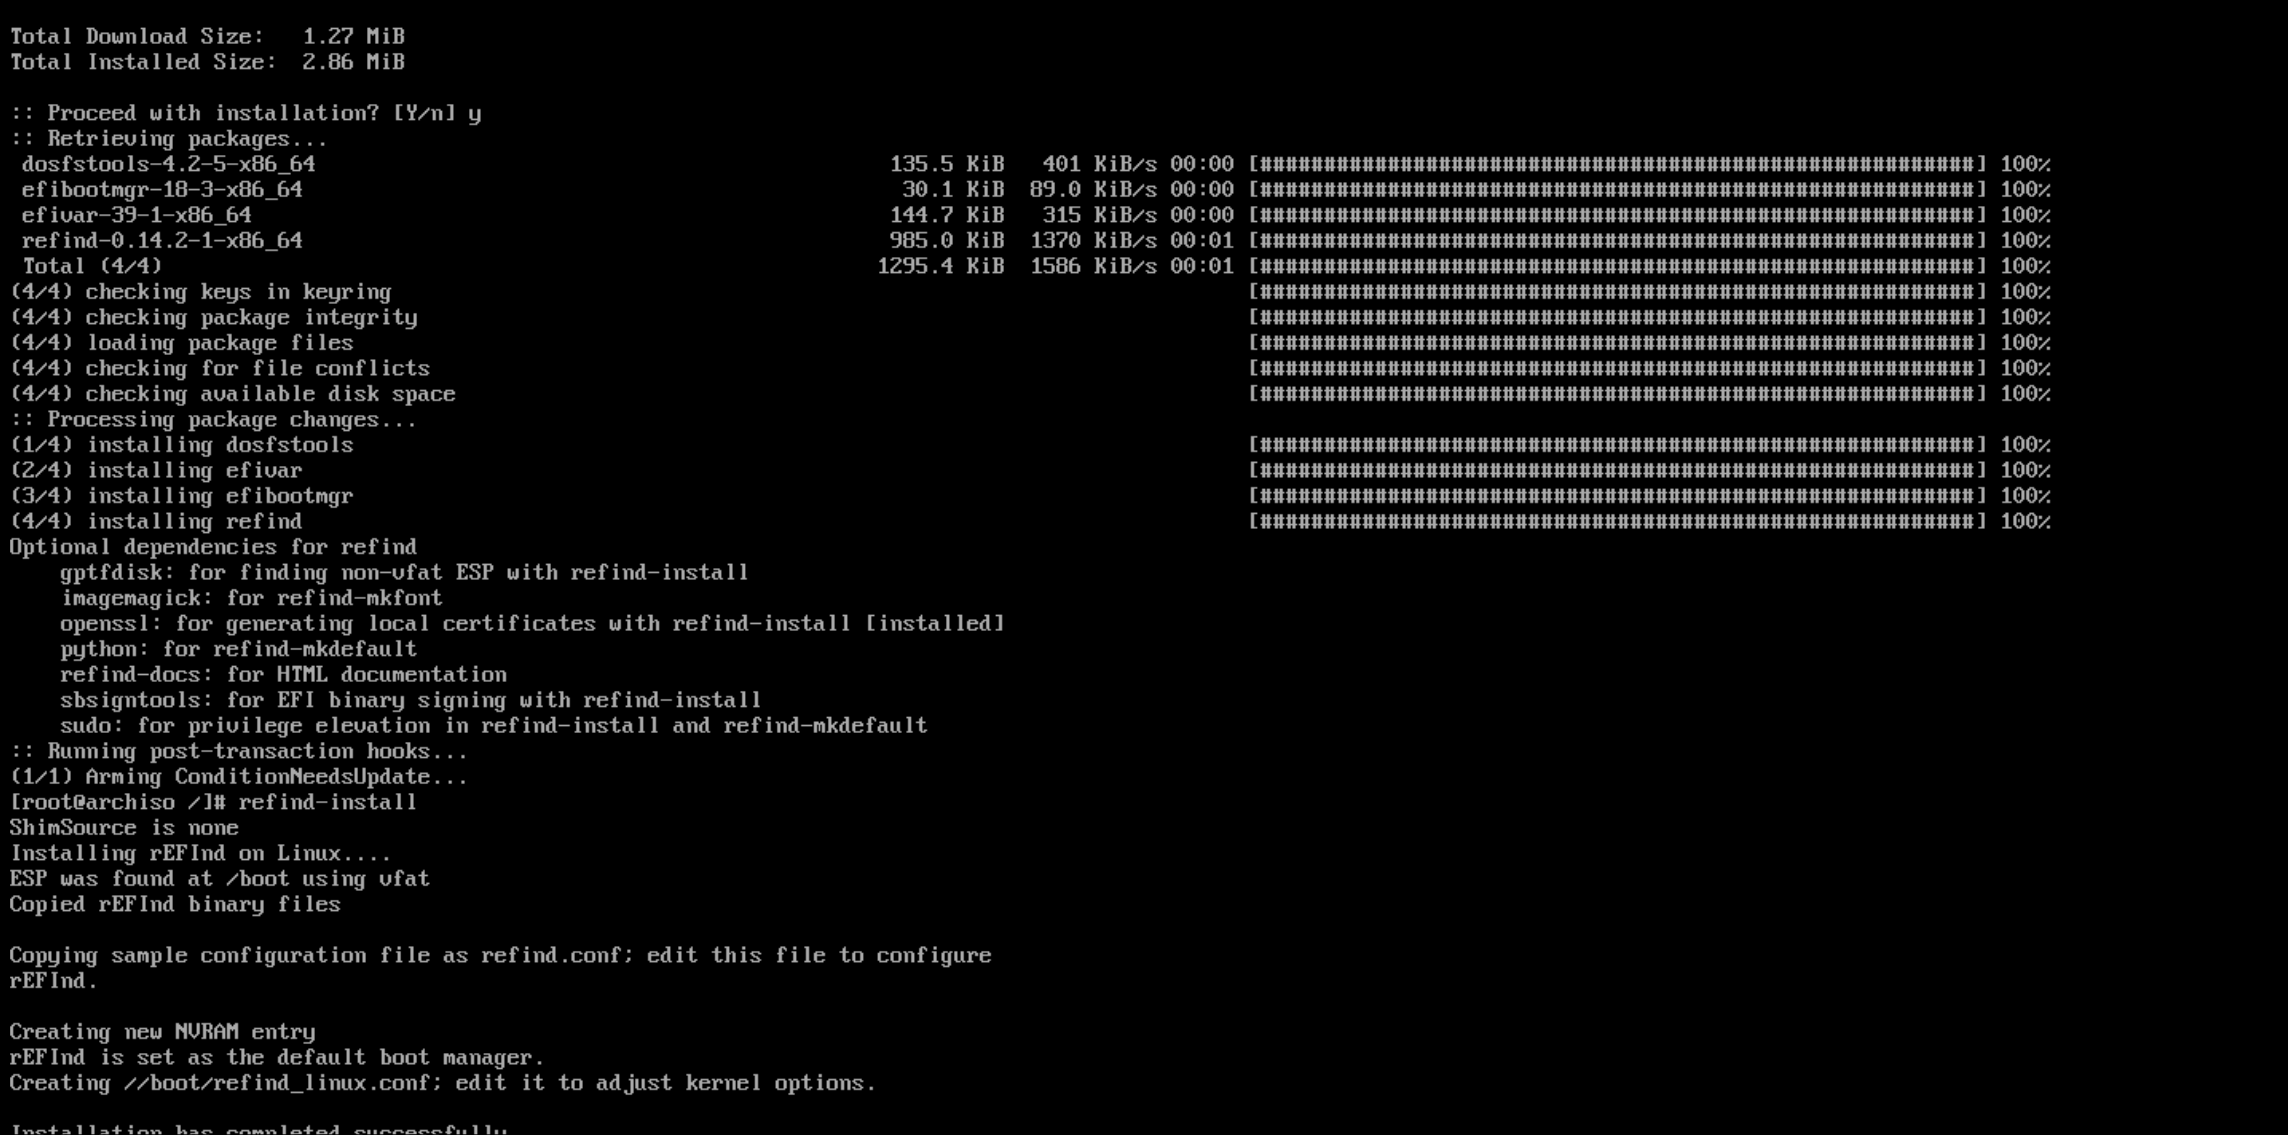
You should see that rEFInd was able to find ESP at /boot and that it’s copied some config files over.
If this is the case we can then configure an entry for rEFInd to be able to find Arch Linux and boot it.
We’ll need the UUID of the Arch Linux partition. This can be obtained with:
blkid /dev/vda2 | awk '{print $2}'
We will need this for the next configuration file so make a note of this.
Edit the file /boot/EFI/refind/refind.conf using your favourite text editor again and go to the very bottom of the file and create the following entry:
menuentry "Arch Linux (Encrypted)" {
    loader /vmlinuz-linux
    initrd /initramfs-linux.img
    options "cryptdevice=UUID=uuid:cryptroot root=/dev/mapper/cryptroot rw quiet"
}
Make sure you replace the lowercase “uuid” in the options line with your UUID. It should look like the following example but with the UUID you got with the blkid command.
options "cryptdevice=UUID=6232eee-ad43-44b5-b50f-ca325ad34345f:cryptroot root=/dev/mapper/cryptroot rw quiet"
Be careful of any typo’s in this entry as it could lead to not being able to boot Arch Linux.
Exit the chroot environment with exit and then umount -R /mnt to unmount all partitions mounted to /mnt and close the encrypted drive with cryptsetup close cryptroot.
Lastly reboot Arch Linux with reboot and at this point remove your live USB or media. We should see a rEFInd screen on restart.

Should we see a rEFInd screen like above use arrow keys to highlight over entries you should see one of the entries what we named it as “Arch Linux (Encrypted)” along with some other automatic entries.
Find the encrypted entry and press enter to boot it.

Enter the password to the encrypted drive and if you see an Arch Linux login screen we have successfully installed Arch Linux and configured it in rEFInd with encryption.
On the next part of this write-up we will cover the OpenBSD side of things and do some troubleshooting steps if this Arch install didn’t work or how to recover from issues like I had to when trialing this setup.
Thank you for reading this far if you have. This has been one of the longest guides or write up’s I have done on here so far and it took a lot of trial and error to get this running.
We’ll get into some bonus config afterwards as rEFInd has some nice customizability.
Bonus
rEFInd allows you to add icons from an assets folder. If you add the line icon /EFI/refind/icons/os_arch.png to the menuentry we configured earlier it will change the icon from Tux to the Arch Linux logo.
More can be found in /EFI/refind/icons/ directory.
We’ll get into more of this in the next parts on how we can access this rEFInd config from both Arch & OpenBSD which is helpful if one operating system is having issues.